10/25/2012

Two for One: Vegetable Soup with Pasta & Cheesy Potato Soup

"When baking, follow directions.  When cooking, go by your own taste."
- Laiko Bahrs

I am one of those people who loves vegetable soup.  I love it with meat, I love it with beans, I love it with pasta, I love it with barley, I love it with just vegetables.  As far as I'm concerned there are few ways to mess up a pot of vegetable soup - except with too much salt!  I've been trying out menu planning, and I will eventually (probably in 3-4 weeks) get my sample menu and weekly shopping lists up so you all can check them out.  To that end, today was Veggie Soup day on my calendar.  My four-year-old daughter, Emelyn, helped me plan the menu, and shockingly enough she loves vegetable soup almost as much as I do (may have something to do with the cornbread on the side).  My mom was helping tonight by peeling and dicing potatoes, and she dumped too many in the sink to wash.  So we ended up with two soups on the table, which suited everyone fine (except my two-year-old son, Jaxson, who splattered his everywhere).  Have fun with these just-right-for-fall soups.


Vegetable Soup with Pasta

1 can each: 
   - green beans
   - corn
   - peas
   - carrots (I had none, hence their absence in pictures)
   - diced tomatoes
   - chicken broth
   - condensed tomato soup
   - tomato sauce
   - you can also add a can of Garbanzo beans
3-5 medium potatoes, washed, peeled, diced (1/2")
2 cups uncooked elbow macaroni
1 cup water

1.  Empty all cans into large heavy-bottomed stockpot or Dutch oven.  Add potatoes.  Stir to combine.  Bring to boil, reduce to simmer.  Simmer gently over medium-low heat (may have to turn up to medium depending on size of your pot) uncovered until potatoes are fork tender but not falling apart (approx. 45 min).


2.  Add elbow macaroni and cook until tender.  The pasta will absorb a fair amount of the liquid in the soup!!!  This is where the water comes in handy.  Once the pasta has cooked, remove the soup from the heat and add the cup of water if needed.  You may not need it, I did.  I wouldn't have if I had removed it from the cap as soon as it was tender, but I left it sitting and it kept absorbing...


Cheesy Potato Soup

~3 lb Potatoes, washed, peeled, diced (1/2")
1 lb Velveeta
Water
Salt to taste

1.  Dice potatoes directly into small amount of water in large heavy-bottomed stockpot or Dutch oven.  Add enough water to barely cover the potatoes, and salt to taste.  You will not be draining this, so go easy on the salt.  No one that I know likes brined potatoes.

2.  Bring to a boil over medium-high heat.  Reduce to medium-low and simmer until potatoes are easy to smash with a fork.


3.  Slice Velveeta directly into soup.  Stir until melted.  And of course, once you have the soups almost done, whip up a batch of White Lily Cornbread to have along with it.

10/24/2012

Mom's Spaghetti Meat Sauce

"The trouble with eating Italian food is that five or six days later you're hungry again."
- George Miller

This is the spaghetti sauce I grew up eating.  To some that might seem strange.  Not many kids enjoy eating mushrooms, peppers, and onions.  Go ahead, call me weird.  I don't mind at all.  The only thing that would make this recipe, and the resulting sauce, any better (and more authentic to my childhood, mind you) would be if Spice Islands would suddenly bring back their spaghetti seasoning.  Hear my plea, Spice Islands!  At any rate, this is a pretty quick and easy sauce to throw together.  You can simmer it all day if you'd like, or it can be done in about 45 minutes (including picture taking time here, folks).  It all depends on how tender you like your veggies to be.  Me?  I don't mind a little crunch.  You can easily increase the size of the batch, since everything is in ones.  When we double (ahem, quadruple) the recipe, whatever we don't use immediately we freeze for later use.  If you do this, just be sure to either use freezer zipper bags (lay them flat on a rimmed pan with the bag folded just under the zipper, resting on the rim - once they are solid, stack them or stand them up) or freezer-safe lidded plastic or glass containers.  Do not, under any circumstances, freeze or store this in metal.  The acid from the tomatoes will do very unpleasant things to the metal and also taint the sauce.

Mom's Spaghetti Meat Sauce

1 can Campbell's condensed tomato soup
1/2 can of water (use soup can)
1 (15 oz) can Hunt's tomato sauce
1 Tb Italian seasoning (or more if you like it herbier)
1 lb ground beef
1 bell pepper, diced
1 onion, diced
1 (4oz) can mushroom stems and pieces, drained, diced
1 lb spaghetti or angel hair pasta
1 loaf crusty bread (Italian, French, etc)


1. Dice pepper, onion, and mushrooms.


2. Mix soup, water, sauce, seasoning, pepper, onion, and mushrooms together in large, heavy-bottomed (to prevent sticking/scorching) pot or Dutch oven.  Simmer over medium-high heat.  If it starts to splatter everywhere, turn it down a notch or two.


3. Start your pasta water heating so it will be boiling by the time you finish this step.  Brown beef over medium heat, drain, add to sauce.  Stir to mix.  Simmer sauce over medium-low heat until spaghetti is done.


4. Prepare your favorite type of spaghetti or angel hair pasta (or any other pasta for that matter) according to package directions.

5. Using tongs, remove pasta from cooking water and add to sauce.  Stir thoroughly.  My biggest complaint here is that the sauce tends to want to sink to the bottom, so you might want to turn the spaghetti out into a serving platter or large bowl so most of the sauce is on top.


6. Preheat oven to 400 degrees.  Slice bread into thick (~2") slices and place on a baking sheet.  I used a pizza pan with vent holes in it.  Bake for 5 minutes, just until the bread is heated through.

7. Serve the spaghetti with pre-grated parmesan (or freshly grated Parmigiano Reggiano) and bread with butter.

9/15/2012

Creamy Chicken and Black Bean Burritos

"When baking, follow directions.  When cooking, go by your own taste." 
- Laiko Bahrs


My brother is somewhat the inspiration for this crock pot meal.  When we vacation in Treasure Island, FL, we typically visit The Floridian, a wonderful little hole-in-the-wall Cuban sandwich shop.  Their pressed Cubans and black beans and rice are delicious!  I have tried in vain to recreate the beans and rice, so instead I decided to make them into a burrito.  This recipe requires either 2 crock pots or a crock pot and a stock pot large enough to cook 1 pound of beans.  I created this recipe November 30, 2009, and I am only now making it a second time.  That may make it seem like the recipe wasn't very good, but I have a large cookbook collection, and I jump around a lot and try my hand at creating my own recipes.  I christened my mom's new stove this time - running my pot of boiling beans over before I soaked them.

Creamy Chicken and Black Bean Burritos

1 lb dried black beans
3 1/2 cups water
1 beef bouillon cube (Don't have this?  Substitute 1 cup broth and cut water to 2 1/2 cups)
4 large boneless, skinless chicken breast halves, cut into strips (~1/2" wide/thick x 4" long)
1 med green bell pepper, cut into strips
1 small yellow bell pepper, cut into strips
1 med onion, cut into strips
1 can each condensed Cream of Chicken and Cream of Mushroom Soup
1 can Rotel Diced Tomatoes with Green Chilies
1 TB Durkey 6 pepper Grill Season blend (or your favorite peppery blend)
Flour tortilla shells
Sour Cream
Shredded Cheese
Salsa
Rice

1. Soak your beans!  Actually, first you need to sort your beans and boil them.  I do not follow the package directions for this.  I sort my beans (see how HERE), rinse them, put them in a large stockpot, and then add 8 cups of water per pound of beans.  The good news is that black beans are much easier to sort than pintos - there is less debris to pick out it seems.  Once they are in the stockpot, bring them to a boil over high heat for a full 5 minutes.  Then turn off the heat, cover, and let sit for at least 2 hours.  I prefer to do this the day before and let them soak overnight, but 2 hours is usually enough to at least get them a little soft.  They might have a bit of a mealy texture, so if you are texture-sensitive, definitely soak overnight!


2. In one crock pot (or in the stock pot) combine soaked beans with water (if you are doing this in the stockpot, increase water to 6 cups) and bouillon cube (or broth if you don't have bouillon).  Cook on low 8 hours or on high 4-6 (if stockpot, medium or medium low - simmer - 4-6 hours). *This time I am low on cooking time, so I bumped it up to high and am checking it frequently for doneness.  Sometimes you have to improvise!*


3. In second crock pot combine remaining ingredients except chicken.  Stir well to combine. 


4. Add chicken.  Stir to coat.  Cook on low 4-6 hours or until beans are done.  *Again, this time I am cooking on high and checking frequently.*


*I forgot my Rotel, so I added it about an hour into cooking.  That accounts for the lack of red in the pictures above.  You will see the Rotel in the finished product.*


5. To serve, use a slotted spoon for the beans (you don't want it liquidy) and a serving spoon or ladle for the chicken (you want the sauce), wrap beans and chicken mix in tortilla shell, add cheese, salsa, and sour cream.  You may want to serve a side of rice (we used Knorr - formerly Lipton - Taco Rice), too.  *It took about 3 hours on high to get completely done.*


8/15/2012

Cherry Cobbler

"One must ask children and birds how cherries and strawberries taste."
- Johann Wolfgang Von Goethe

My daughter decided she needed to make cherry pie.  She wanted a round one.  I finally convinced her a cobbler was easier.  Once her daddy brought us home a big bag of sweet cherries, she helped by removing the stems.  She was busy watching American Girls when I actually made the cobbler, so she didn't help with that part.  It is easy enough, though, that a four year old could do it with some assistance in handling the hot pan.  The good thing with this recipe is you can substitute any fruit you like.  If it is fresh, like these cherries, you are going to want to cook it a little to soften it up.  If it is canned, just pour the whole can in.  Peaches are especially yummy in this, so you would use 1 or 2 15oz cans of peaches in lite syrup (do not drain).

Cherry Cobbler

Bag Bing, black, or other sweet cherry, stemmed and pitted
1 cup sugar
1/2 cup water
1 tsp almond extract

1 stick butter or margarine
1 cup flour
1 cup sugar
1/2 cup milk

1.  Bring cherries, sugar, water, extract to boil until slightly thickened.


2.  Melt butter in 9x13 casserole while preheating oven. 

3.  Sift flour, sugar, add milk and stir.  Should be pancake batter consistency.  Will thicken to cupcake batter consistency quickly.  If that happens add 1/4 cup milk at a time and stir to thin. 

4.  Pour batter on butter. 

5.  Pour cherries on top of batter and jiggle pan to settle. 

6.  Bake on 350 degrees for 30-35 minutes or until top is golden. 

7.  Serve with vanilla ice cream.


7/30/2012

Peanut Butter Overload Pie

"A boy doesn't have to go to war to be a hero; he can say he doesn't like pie when he sees there isn't enough to go around."
- E.W. Howe

This pie was created to satisfy a craving...apparently it was for peanut butter!  I had been wanting peanut butter cookies, and since my daughter likes to do the rolling-in-sugar and then pressing-with-a-fork parts, I thought it would be a good baking activity to do together.  Then, I decided that I wanted peanut butter pie instead.  How could I choose between the two?!  Decision of impossible proportions, so I did what any other baker would do when faced with an insurmountable choice:  I combined them.  I had seen a peanut butter pie with chocolate fudge crust when I vacationed in Florida and ate at Sea Hag, but I didn't want a chocolate crust.  I did want to incorporate chocolate somehow, so originally I thought about chocolate chips on top.  Then, I settled for a ribbon of fudge on top of the crust but under the pie filling...and chocolate chips on top.  Thus was born Peanut Butter Overload!  I hope you've got your sweet tooth ready for this one!

Peanut Butter Overload Pie

Crust: Peanut Butter Cookies

Better Homes and Gardens New Cook Book (© 1976)

1/2 cup butter (or margarine)
1/2 cup peanut butter (creamy)
1/2 cup granulated sugar
1/2 cup brown sugar
1 egg
1/2 tsp vanilla
1 1/4 cups sifted all-purpose flour
3/4 tsp soda (baking)
1/4 tsp salt

1. Thoroughly cream butter, peanut butter, sugars, egg, and vanilla.


2. Sift together dry ingredients; blend into creamed mixture.

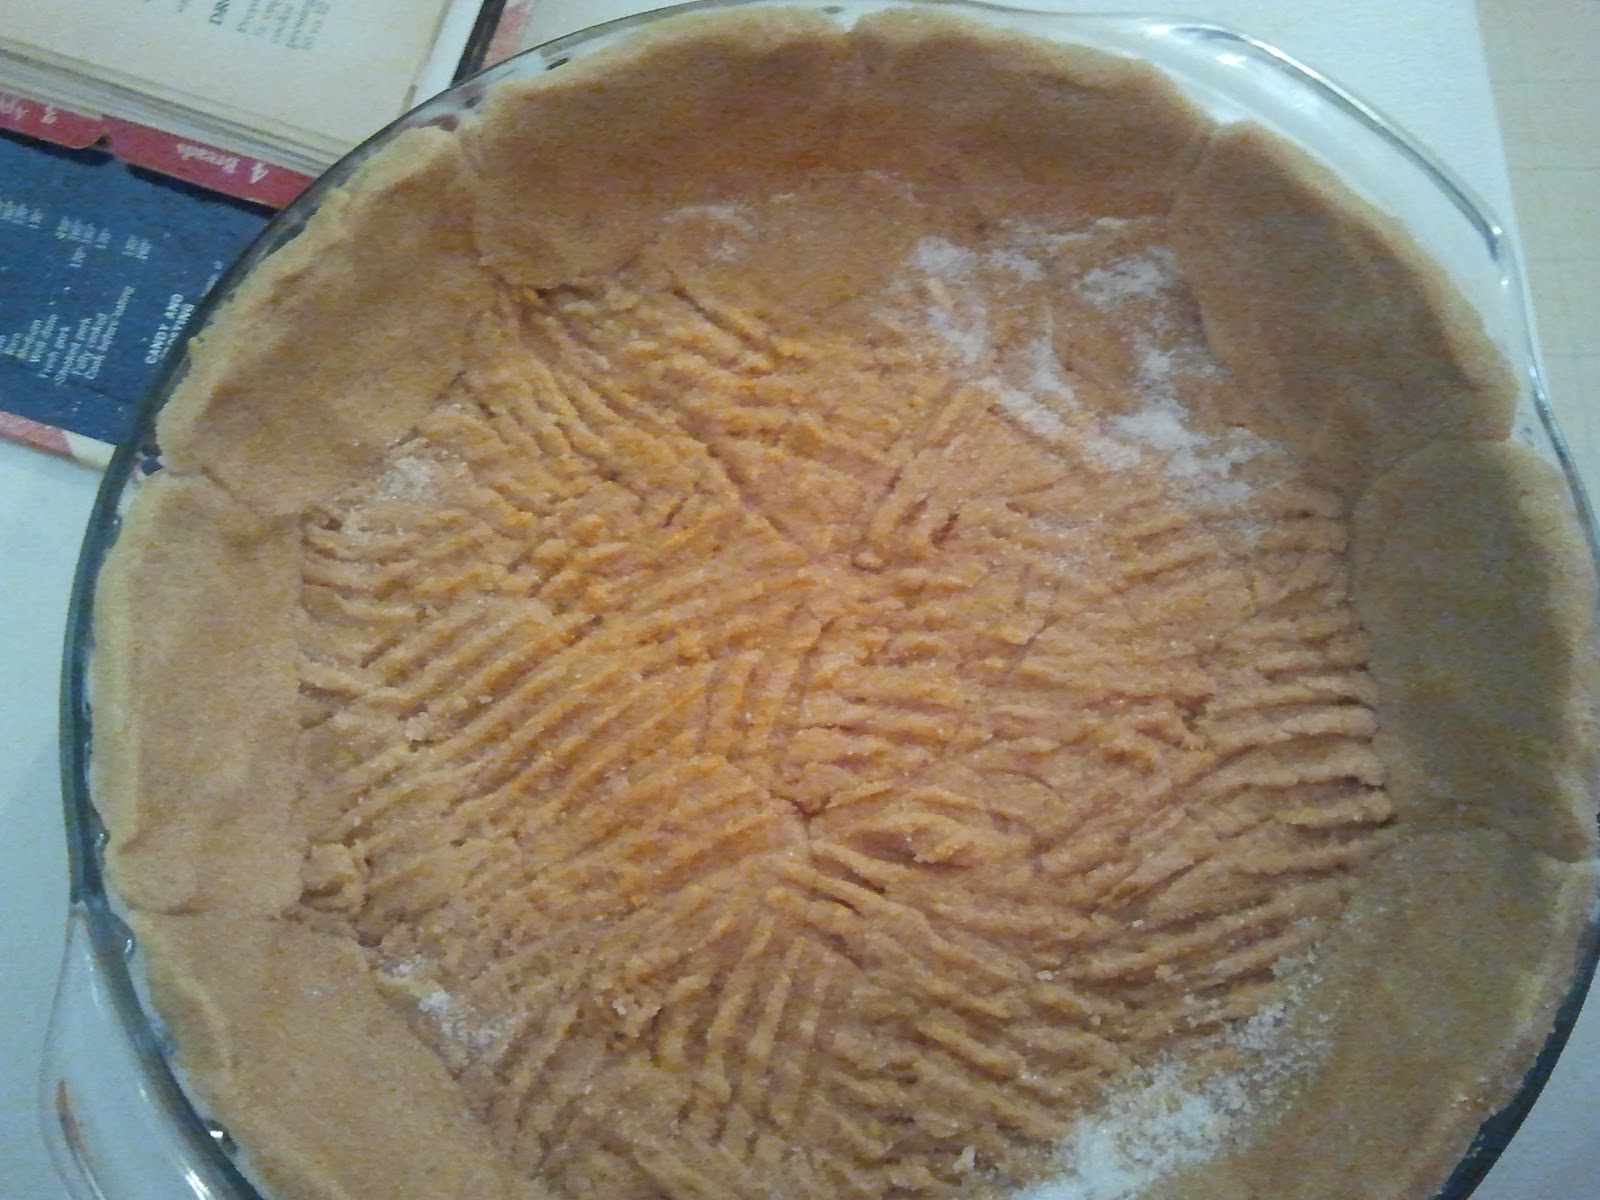
3. Here is where I break from tradition.  I thought about baking the cookies, crumbling them, and forming them a la graham cracker crust.  Then, I decided to form a crust from the dough.  Later I thought about baking the whole batch and then breaking them to fit in the pan.  After eating a day-old piece, I know that wouldn't work because the cookie absorbs the moisture and disintegrates when you touch it.  So, go ahead and press the dough into a deep-dish pie plate (I used a glass one that was about 9" diameter).  I used a small (Tbs) scoop to drop "cookies" into a bowl of sugar, rolled them around, and then used a fork to help press them into the bottom of the pan.  I did the same for the side crust, and then mashed the two layers together at the edge of the bottom.  I also had dough left over to make 8 cookies (you may want to do this first, to be sure you have them for the top), and baked them alongside the crust at 375 degrees F for 10 minutes. 

Cookies can be removed at this point (if doing all cookies, roll in sugar, place 2-inches apart on ungreased cookie sheet, press tines of fork into top in criss-cross pattern, bake at 375 for 10-12 minutes).


4. You may have a problem with the crust not getting done.  When I checked it the first time, it was puffed up to the top of the pie plate.  I used a fork to deflate it after baking 10 minutes, put it back in the oven and baked it for five more minutes.  I continued this process until the crust was evenly browned, and then I deflated it a couple of times as it cooled.  Do not worry if it has an almost gummy texture.  It will change as it cools.

Fudge Layer: Fantasy Fudge

KRAFT Marshmallow Creme jar

6 cups sugar
1 1/2 cups margarine (3 sticks)
1 1/3 cups evaporated milk (we use whole)
2 12-oz pkg semi-sweet chocolate pieces (4 cups)
1 13-oz jar KRAFT Marshmallow Creme
2 cups chopped nuts (omitted)
2 tsp vanilla

*I halved the recipe for this purpose

IMPORTANT:  Butter your 13x9-inch glass dish BEFORE you start making the fudge!!!


1. Combine sugar, margarine and milk in heavy 5-quart Dutch oven; bring to full rolling boil, stirring constantly.  Continue boiling 5 minutes over medium heat or until candy thermometer reaches 243 degrees F, stirring constantly to prevent scorching. 


2. Remove from heat; stir in chocolate pieces until melted.  Add remaining ingredients; beat until well blended. *Scoop out 1 cup of fudge and pour/spread over cooled crust before proceeding to #3 


3. Pour into two greased 13x9-inch baking pans (one pan if doing half batch).  Cool at room temperature; cut into squares.  6 pounds.


Filling: Peanut Butter Pie

from Dorothy Baker, Mountain Recipe Collection by: Valeria S. Ison

1/3 C. peanut butter
3 oz. cream cheese (I used 8 oz block)
1 C. powdered sugar
8 oz. Cool Whip
1/2 Tsp. vanilla

1. Mix peanut butter, cream cheese, powdered sugar and vanilla well.
2. Add cool whip 1 spoonful at a time.


3. Put in graham cracker crust and chill 2 hours.

*We use a wire whisk attachment on electric stand-mixer on medium to high for #1, then on stir/low for #2.  For this, you pour over fudge as soon as it has solidified in the bottom of the pie crust.


Embellishment

After the pie filling has been spread in the crust, sprinkle chocolate chips on top.  Break four of the cookies you baked in half and press them (broken side down in domes) into the filling at regular intervals.  This will be 1/2 cookie per slice for an 8 slice pie.  If you intend to cut it into more or fewer slices, you can certainly use all 8 cookies for a total possible of 16 slices.  My family descended upon the cookies and ate half of them before I could stop them, so I ended up with four for the pie and one to split between my kids.


NOTE: This pie must be refrigerated due to the cream cheese and cool whip!