6/18/2013

Easy Cinnamon Rolls

"Cinnamon bites and kisses simultaneously."
- Vanna Bonta

I love homemade cinnamon buns, but I don't always have time to spend making The Best Ever Cinnamon Rolls, which truly are the best but take a really really long time to make.  I'm talking overnight.  These take relatively little time when compared to that, and they taste so much better than what you can get in a can - no offense Poppin' Fresh!  You will need to check out the recipe for Blue Ribbon Buttermilk Biscuits, since that is the base for these cinnamon rolls.  After you get the dough mixed and rolled out (I do recommend rolling rather than patting the dough for this), you could top it in any way you want - orange zest, cranberries, and pecans; raisins, cranberries, pecans; apples and walnuts; marshmallows, graham cracker crumbs and chocolate chunks - mmmmm!  I may have to try that - S'mores Rolls.  This is very versatile, it just all depends on what you like.

Easy Cinnamon Rolls


Biscuit dough
1 cup brown sugar, loosely scooped
6-8 Tb butter
1 tsp cinnamon
1/4 cup flour
2/3 to 1 cup: baking raisins, Craisins, or broken pecan pieces (or up to 1 cup of each!)
1 cup powdered sugar
2-4 Tb milk
1 tsp vanilla

A note about "baking" raisins:  I did not know such a thing existed until a couple years ago.  They are packed in a small amount of liquid so they stay soft and a little more plump than their boxed/bagged counterpart.  Either version will work with this recipe.  Regular raisins will plump up when you add heat and a little moisture, so if you don't have "baking" raisins, don't fret, just use whatcha got.

1. Make biscuit dough.  You can't make these without it!


2. Turn dough out onto lightly floured surface.  Gently pat it into a ball.  Roll dough out to large rectangle (18" x 12" roughly).  I prefer to use a silicone pastry mat for a couple of reasons - it keeps my table from having bits of stuck-on dough all over it, and it helps me to be able to roll everything up later on.  I also use a Wilton fondant rolling pin with the 3/16" guides on it - that way the thickness is consistent.


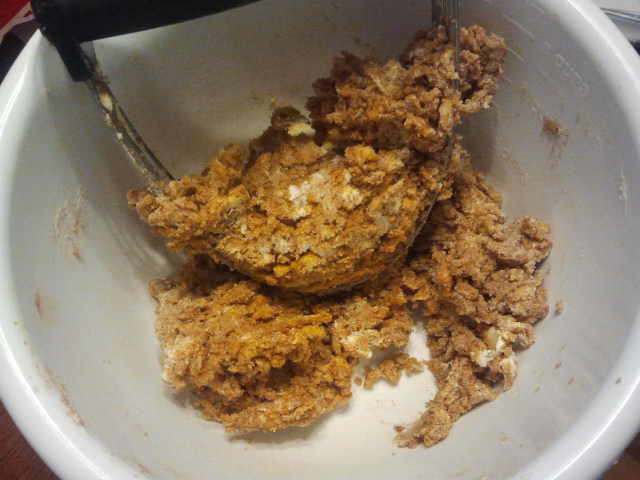
3. Cut butter into chunks and use a pastry blender, two forks, or two knives to "cut" butter into sugar and cinnamon until it is almost paste-like.  Basically you just mash it all up.  It will have large clumps, that is perfect.


4. Evenly sprinkle sugar mixture on dough - I suppose if you were careful you could actually spread it, but sprinkling works just fine - leaving a 1/2" border around the edges.  Top with raisins, Craisins, and broken pecan pieces.  *I wrote out the recipe long ago, and when I made it recently I did NOT use the flour.  Actually I can't even remember now what I used it for, but I suspect it was to keep the dried fruit and nuts from clumping together.  So, if you want, you can toss the dried fruit and nuts (if using) in the 1/4 cup flour before you sprinkle them.  Makes them a bit easier to work with, and it may help to thicken the syrupy sugar and butter.*


5. Starting on the long edge of the dough, roll the dough carefully to the other side.  Make sure you keep the roll tight so it is round instead of flattish.  This is where I use the silicone mat to help me roll.  It is easier to lift the entire edge of dough at once if you have something under it.  If any of your stuffing falls out, just pick it up and poke it back in (or you could eat it).


6. Trim the excess dough from both ends - this more-or-less just makes it look nice and even but is an unnecessary step.  Cut filled, rolled dough into 1 1/2" portions - I don't actually measure this, I just divide my dough in half and each half into 4 pieces so I have 8 servings (check out my knife score-marks).  Place them in a lightly greased deep dish pie plate or casserole dish.  Make sure the sides either touch slightly or are very close together - in other words do NOT space them out in a 9x13 like I did in this photo, I usually use the deep dish pie plate and it works fantastically - otherwise the rolls flatten out and all the stuff runs out and gets stuck all over the dish instead of being inside the yummy-scrummy rolls.


7. Bake in a preheated 450º oven for 10-15 minutes, or until tops are golden brown.


8. In a small bowl, mix powdered sugar, milk, and vanilla to make a thick glaze - 2 Tb will make a considerably thicker glaze than 4 Tb, so start with 2 and adjust until you have the consistency you like.  Spread or spoon glaze on tops of cinnamon rolls.


Sauce for Cake

"You can say this for ready-mixes - the next generation isn't going to have any trouble making pies exactly like mother used to make."  
- Earl Wilson

You won't find this in the ready-mix aisle of your grocery store.  This isn't a pie, but it is a dessert topping not too many people are familiar with.  It was passed down from my great-grandmother to my mom, and it has been a long-standing dessert favorite in our household.  When I talk about cake and sauce I generally receive a look of either disgust or you-must-be-joking.  I am not joking.  Again, like chocolate gravy, it is an old-timey country, mountain thing.  Think of it as sweet gravy, but for cake.  It is best served over warm, from-scratch, vanilla cake.  In a pinch, though, any variety of yellow or white cake mix will work.  Butter Golden or French Vanilla are our go-to's when we want the sauce without the time-consuming effort of making a scratch cake.  Don't knock it until you try it, either.  It is a sweet, warm, vanilla-ey sauce that you will want your cake swimming in.  We never ever ever ever make a single batch, we always double, but more often triple it.  It keeps in the fridge for a couple of days (but I doubt it will last that long), and you just pop it in the microwave on medium to reheat it.

Sauce for Cake


1/2 cup sugar
2 Tbs flour
1 cup milk
2 Tbs butter
2 tsp vanilla

1.  Place all ingredients in a heavy-bottomed medium saucepan over medium heat.


2.  Cook until thickened and bubbly.  Pour over warm cake.
  

6/02/2013

Black Bean Chicken Tortilla Soup

“Good manners: The noise you don't make when you're eating soup.”
- Bennett Cerf


I love chicken tortilla soup, but I could never find just the right combination of ingredients in someone else's recipe.  So when I was pregnant with my son I put my mind to work and decided what I would like to have in chicken tortilla soup:  beans, chicken, and vegetables.  Once that was settled, I got busy in the kitchen.  This does take some time to complete, as do all good soups.  You can make a soup fairly quickly, but the longer they cook the better they tend to taste.


Black Bean Chicken Tortilla Soup

Beans:

1 lb black beans (dried)
4 14oz cans Swanson Chicken Broth
10 c water

Chicken:

1 5lb fryer
canola oil
salt & pepper

Soup:

1 softball sized sweet onion, 1/4" dice or less
3 medium carrots, 1/4" dice or less
3 medium stalks celery, 1/4" dice or less
1 each red/yellow bell pepper, 1/4" dice or less
5 cloves garlic, minced
canola oil
3 Tb lime juice
1 tsp cayenne
1 tsp chili powder

Toppings:

6-10 corn tortillas, cut into 1/4" strips
2 c canola oil
1 tsp paprika
1 tsp chili powder
3/4 tsp cayenne
1/2 tsp salt
8oz Colby-Jack cheese, grated
avocado slices
sour cream
jalapeño slices
salsa

1. Sort and rinse beans.  Soak beans overnight.  Rinse.  Place in large stockpot with chicken broth and water.  Simmer covered until ready to eat (approx 4-6 hours).


2. When beans have been cooking approximately 2 hours, remove giblets from chicken.  Pat chicken dry with paper towels.  Place breast-side up in covered baker (Corning Ware, Pampered Chef, etc).  Rub oil on skin.  Sprinkle with salt/pepper.  Bake covered at 325º until internal temperature of breast reaches 165º (I use a thermometer you leave in the meat while it cooks).


3. After chicken is roasted, remove meat from bones.  Stir meat into beans.


4. Saute vegetables in oil over medium heat until onions begin to turn translucent.


5. Add all vegetables, and lime juice, cayenne, and chili powder to beans.  Stir and simmer while completing crispy tortilla strips for topping.


6. In small saucepan, heat oil over medium-high heat (350
º - 400º F on candy thermometer) until test corn strip is crispy after 4 minutes.


7.  Mix seasoning (paprika, chili powder, cayenne, salt) in small bowl. 

8. Fry approximately 10 strips per batch for 4 minutes.  Drain on paper towels.  Transfer to bowl.

9. Sprinkle seasoning over crisps and shake bowl to distribute


Serve with Colby-Jack cheese, avocado slices, sour cream, jalapeño slices, salsa, and Mexican cornbread.


5/21/2013

Chicken Cordon Bleu

"I always think if you have to cook once, it should feed you twice..."
- Curtis Stone


This is a super easy adaptation to a frozen, breaded, rolled up version of Chicken Cordon Bleu my husband fell in love with when we were still dating.  We were still in the trying-to-impress-each-other stage of the relationship, so when I saw how much he loved this I strove to figure it out.  Come to find out is was pretty easy, which is always a plus, and it tasted better than the breaded version.  Just be sure to have a good supply of toothpicks (at least 2 per serving, but up to 4) to hold them together while you get the first side cooked.  By slicing each chicken breast half in half, you extend your feast.  You can either feed more people for less money, or you can save the leftovers for lunch (or dinner) the next day.

Chicken Cordon Bleu

6 chicken breast halves, approximately 2 lbs 
    (thaw if frozen)
6 thick slices deli ham 
    (honey ham is our favorite)
6 thick slices deli baby Swiss cheese
cooking spray
vegetable oil
toothpicks
rice & vegetable of choice 
    (whole grain/wild  & broccoli pair nicely)


1.  Be sure your chicken is completely thawed.  If it is frozen, place in a single layer, cover with wax paper and defrost in the microwave.  The microwave I use has an automatic defroster on it, so I just have to key in the weight of the food.  It will beep when it needs to be flipped.  If yours does not have this function, I would do about 4 minutes per side (for 2 lbs), flip, and 4 minutes on the other side.

This is only 5 of my 6 pieces, I had already begun halving the 6th one before I took this pic
2.  Once it is at least defrosted enough to slice, halve each breast half horizontally so you have 12 breast-sized pieces of chicken.  They may still be partially frozen.  Just pop them back in the microwave on defrost, but set it at half the weight (or time) as you did previously.  This time they should be pretty close to completely thawed.


3.  Once you have them completely defrosted, lay them on a wax-paper and paper towel covered cutting board or cookie sheet.  I did 3 layers of 4 pieces with paper towels in between each layer to help absorb the liquid.  Pat the top layer of chicken dry with paper towels.  This is a good time to get your rice started cooking.


4.  While your chicken rests and dries a bit, slice your ham and cheese in half so you have 12 pieces of each. Keep them handy!


5.  Moving counter clockwise from the bare piece of chicken on the far right, you will top first with a slice of ham.  Fold a slice of cheese in half and place on top of the ham, slightly to one side or the other.  Fold the chicken and ham across the cheese so you have a little bundle.


6.  This is where you start using the toothpicks.  If your chicken is thinly sliced enough to thread the toothpicks like you are sewing the chicken together, that is great.  The first piece I did was the only one that worked out that way.  The rest of them, I just skewered with the toothpicks to make sure the bundle stayed folded over and the cheese was as protected in the middle as I could get it.


7.  Once you have your chicken skewered, spray a large non-stick pan with cooking spray and place over medium-high heat.  Once the pan is hot, add about 1 Tb oil.  Place the chicken bundles in the pan and cook until the bottoms are no longer pink and have begun to brown.  Flip them over and brown the other side.  If the toothpicks are holding the chicken off the pan, just press the chicken down (please use either a fork or pair of tongs so you don't burn your fingers) so it touches the surface of the pan.


8.  After the second side has browned, stand the bundles on their folded sides around the edge of the pan to get the folded area browned and to be sure the chicken is cooked through.


9.  After the folded side has cooked, remove the bundles to a plate.  Most of the cheese should still be inside the bundles, but some of it will inevitably ooze out into the pan.  Just scoop it up and glop it on whichever bundle looks like it needs a little extra cheese.


10.  We served ours with Butter & Herb Rice and macaroni (for the kids).  Just remind everyone to pull out the toothpicks before they start eating.  Alternatively, if you're feeling particularly generous after cooking for everyone, pull the picks out before serving.

3/05/2013

Buttermilk Ranch Fried Chicken Sandwich

"You don't want to make a steady diet of just lettuce. You don't want to make a steady diet of fried chicken."
- Paula Deen


If, however, you eat them together you should be just fine.  My mom made these chicken sandwiches when I was a kid, and I have only been able to get them perfect a couple of times.  Heating oil and then frying something in it (other than corn chips) takes a bit of practice.  I don't like to fry very often for several reasons:  it is not healthy, my gallbladder does not like grease, I don't like the way my house smells afterward, and unless I'm frying a batch of fresh fish and homemade hush puppies I feel it is a tad bit expensive to use oil once and then toss it.  That being said, I don't have a whole lot of practice under my belt on this particular dish.  When the crust fries to perfection, though, let me just tell you...Colonel Sanders better run and hide!  My mom never added the Ranch dip mix to hers, she just dredged them in flour after a buttermilk bath.  Either way you want to do them is A-Ok.  If you just do flour, season it with some S&P first.  I seem to be missing quite a few pictures of this process, but it really is very straightforward.

Buttermilk Ranch Fried Chicken Sandwich


2 cups all-purpose flour
2 packets Hidden Valley Ranch powdered dip mix
1 qt buttermilk
vegetable, corn, or canola oil for frying
5 or more boneless, skinless chicken breast halves

1. Be sure your chicken is thawed and close to room temperature before you begin so it will cook evenly and quickly.  Halve each breast horizontally (aka butterfly it all the way through), so you have 10 pieces of thinner chicken breast halves.
2. Heat oil in a large, heavy-bottomed, high-sided skillet, cast iron, dutch oven, electric skillet or deep fryer, or saucepan.  I add oil to half the depth of the pan I am frying in.  Oil should be between 325º and 350º.  Use a candy thermometer (or electric skillet or fryer) to maintain oil temperature.  I used the skillet my mom always used.  If you look closely at the top center of the skillet, there is a dark spot.  That is where the skillet caught fire while she was frying up a batch of this type of chicken when I was a kid - probably 20 years ago.  There is a depression in the skillet, but no hole, so of course we still use it to fry chicken!


3. While oil is coming to temperature, pour buttermilk into a wide dish that is about 1" deep (pie plate or cake pan will work for this).  Place 4 pieces of chicken at a time in the buttermilk and soak for at least 5 minutes.  If the buttermilk doesn't cover the pieces, turn them to coat.


4. In a separate dish, mix together the flour and Ranch mix.  Stir until it is well-blended.  

5. After the breasts have soaked in buttermilk, let the excess drip off.  Lay the breasts in the flour mix.  Press them into the flour before turning them to coat.

6. Once oil is heated, carefully shake excess flour back into the dish and ease the chicken into the hot oil.  I don't do more than 4 pieces at a time.  Less is better because the oil temperature drops each time you add a piece of meat.

7. I didn't time this, so I'm not sure of an exact amount of time they need to fry.  I go more based on color.  Fry them until they are golden, then check with an instant read thermometer to be sure the internal temperature is 165º.


8. If you are frying a large batch, keep them warm in the oven.  You may want to put them on a wire rack on a pan, because the crust may stick to the pan and pull off when you are ready to serve it.  I heated the oven and pan to 250º while the chicken fried.

  
9. You can certainly serve this with any of your favorite sides, but we prefer to eat them on a white bun with lettuce, tomato, cheese, mustard, and mayonnaise.