1/31/2013

Chili Pot Pie

"Chili is much improved by having had a day to contemplate its fate." 
- John Steele Gordon


My mom created this recipe when I was a kid.  It was an instant hit and has survived for 18 years in her handwritten collection of "My Favorite Recipes."  It is basically chili with a Mexican-style cornbread on top.  You can use canned chili (as the recipe is written), but if you have homemade chili and want to use that you certainly can.  It can't get much simpler than this, and I had dinner on the table in about 40 minutes last night including prep time.  My daughter loves it, but my son doesn't tolerate beans (texture issue).  It is fabulous served up with salsa and sour cream and a side of rice.

Chili Pot Pie


1 can Brooks Chili Beans
1 can Hormel Chili without Beans
1 can Rotel tomatoes with green chilies
1 egg
1/4 cup oil
1 1/2 cup cornmeal mix
shredded cheese

NOTE:  If you do not have chili beans and chili without beans, you can use 2 cans of chili with beans (which is what I did)

1.  If you are using a can of chili beans and a can of chili without beans, stir them together in a bowl before spreading them in a 9x13" oven-proof casserole dish.  If you are using 2 cans of chili with beans, spread them in the bottom of the dish - no need to mix them beforehand.


2.  In a medium mixing bowl, stir together the egg, oil, and Rotel until mixed.


3.  Add the cornmeal mix to the Rotel mixture and stir until combined.  It will be somewhere between the consistency of White Lily Cornbread batter and pancake batter.


4.  Pour the cornbread mixture evenly over the chili in the casserole dish.  Use a spoon or spatula to gently spread the mixture to the edges.  Be sure to cover any bare spots and all the way around the edge of the dish so the chili doesn't bubble up through it.


5.  Bake in a 400º oven for 30-35 minutes or until the cornbread is done in the middle (don't mistake moisture from the chili as raw cornbread batter when you check it) and golden brown.


6.  Top with shredded cheese of your choice and return to the oven for approximately 5 minutes, until the cheese is melted and bubbly.


1/29/2013

Chicken & Broccoli Bake

"Show me another pleasure like dinner which comes every day and lasts an hour."
- Charles Maurice de Talleyrand

I created this dish when I was a senior in high school.  My best friend and I visited my grandparents once a week and prepared dinner for them.  This was one of those things that just popped into my head, and when I made it everyone loved it.  It is still a favorite, though I rarely make it.  Fairly quick and simple, you can make it from a few pantry staples.  If you don't have everything on hand, a trip to Save-a-Lot or a local grocery store should give you what you need.  It is a casserole a-la Chicken Divan, only a whole heckuvalot simpler.  I know...I've made it before.


Chicken & Broccoli Bake


Original Recipe

3 boneless, skinless chicken breast halves (defrosted if frozen) ~1.5lb
12 oz frozen broccoli florets (set out to thaw while you wait to add it)
1 10oz can condensed Cream of Mushroom Soup
1 10oz can condensed Cream of Chicken Soup
1/2 cup milk or cream


1. Preheat oven to 450.  Empty cans of soup into large nonstick skillet.  Stir in milk.


2. If chicken is frozen, defrost in microwave.  Dice chicken breasts into 1/4 - 1/2" cubes.  Add to soup mixture.  Turn heat on medium high.  It will bubble, but you don't want to boil it.  Stir occasionally to prevent sticking.


3. While chicken is cooking, prepare Biscuit dough.  I only made enough for 6 thick or 10 thin biscuits.  You want them thin (~1/4" thick patted out).

4. After chicken has turned white, add broccoli and stir to combine.  If broccoli florets are large, use a pair of kitchen scissors to cut it up.  You want everything to be roughly the same size so it cooks evenly.


5. Once the broccoli has defrosted and warmed slightly, remove skillet from heat.  Pat out Biscuit dough, and cut biscuits.  Leave them on the counter for now!


6.  Pour chicken and broccoli mixture into a 9x13" oven-proof casserole dish.


7. Top casserole mixture with biscuits.  Lay them evenly across the top.  I did 3 down each long side, 2 down the middle.  With the extra dough I cut 3 more biscuits (11 total) and used the cutter to halve 2 of them (1 crescent moon, 1 football shape) and cut the last one into thirds (2 crescent moons, 1 football shape).  The biscuit pieces are used to fill in the spaces on the top.


8. Place casserole in preheated oven and bake for 12 minutes or until the biscuits are evenly browned.


05-04-16 Revision

Tonight I made this for supper. I suppose the last time I made it my daughter still wouldn't eat broccoli. She tried it, and she loved it! It makes my heart happy when I can feed my family a meal they like. She just kept going on about how good it was and even said, "You know how hot cocoa is good on a cold day? Well this would be good on a cold day, too!" This may be my big hint to make it more than once a year.

1. Preheat oven to 450º, make full batch of Blue Ribbon Buttermilk Biscuits dough, let sit in bowl while you make the filling.
2. Cook frozen chicken over medium heat until starting to turn white on bottom, remove to cutting board and cube, return to pan. Cook until almost done (only a little pink should be visible).
3. Add 2 cans each condensed cream of chicken and condensed cream of mushroom soup and ~1/3 - 1/2 c milk. Stir well to combine. Bring to a bubble. 
4. Add partially defrosted, chopped broccoli florets to pan, turn heat to medium low, have someone else stir while you make the biscuits.
5. Make biscuit topping - knead dough quickly on lightly floured surface, pat out to ~1/4" thickness, cut with 3" biscuit cutter. Pour chicken filling into buttered casserole dish (11"x15"), top with 12 biscuits spaced evenly, bake for 15 minutes or until biscuits are an even golden brown (start with 10 minutes, and add time in 3 minute increments, it took about 15-18 minutes for mine) and filling is bubbling (put biscuit trimming pieces on a small pan and bake alongside the casserole).
6. Let cool 5-10 minutes before serving.

1/23/2013

Black Forest Cookies

"Baking cookies is comforting, and cookies are the sweetest little bit of comfort food.  They are very bite-sized and personal."
- Sandra Lee

I came up with this recipe going on 10 years ago now to take to an EKU Honor's Program picnic.  The cookies did not last long!  They quickly became the favorite cookie of my husband (who was then my boyfriend).  Since you use a boxed cake mix, they take very little time to prepare.  The only problem I see is that you can't eat just one...oh, and beware of cherry pits!

Black Forest Cookies


1 Duncan Hines Classic Dark Chocolate Fudge cake mix
2 large eggs
1/2 cup butter/margarine, melted
1/4 cup firmly packed brown sugar
1 tsp vanilla extract
1 cup semisweet chocolate chips
1 can cherry pie filling

The basic recipe can be found on the side of SOME of the DH cake mix boxes.  Step 3 is where my recipe is different

1. Place cake mix, eggs, butter, brown sugar, and vanilla extract in large bowl.  Stir with spoon until thoroughly blended.  Stir in chocolate chips.


2. Drop by level tablespoonfuls (I used medium sized Pampered Chef scoop) onto greased baking sheets.


3. Using your thumb (spray thumb with cooking spray first), gently press into the top of each cookie.  Be careful not to press too hard, you just want a slight indention.  Spoon one cherry and a bit of "goop" into each indention.


4. Bake at 350 for 12 minutes for chewy cookies or 14 minutes for crisp cookies.  Cool 2 minutes on baking sheets.  Remove carefully to cooling racks.  Cool completely.

NOTE: These cookies soften after they are cooled and stored.  Do not store them in an air-tight container!  I would recommend storing them in a single layer and loosely covering them with plastic wrap.  Otherwise the cherries fall out the bottom of the cookie.  They still taste fabulous, but it is a bit disappointing to have to eat the cookie with a fork when it falls apart.

1/18/2013

Pizza 3 Ways

"There's a pizza place near where I live that sells only slices.  In the back you can see a guy tossing a triangle in the air."
- Stephen Wright

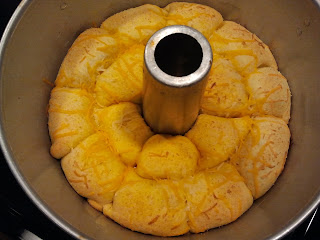
This is something I came up with for my kids.  They love pizza in any form.  Using refrigerated biscuits cuts prep time considerably.  I personally do not like canned biscuits, so I don't love this recipe, but I like it enough I would eat it again.  My kids, on the other hand, begged for more!  As promised, using the same set of ingredients, you will be able to make pizza 3 different ways in about an hour.

Pizza 3 Ways


2 cans Pillsbury Grands Butter Tastin' biscuits (16 biscuits total)
1 jar pizza sauce
1 package pepperonis
Fancy Shred Mozzarella and Cheddar cheese
4 Tb butter
garlic clove, minced -or- garlic powder/salt

Pizza Pull Apart Bread


1. Divide each biscuit in half.  You can either slice it into 2 half-circles, or you can separate it into 2 layers as if you were separating it after baking.  The second method is a bit trickier, but you need to do it for the next 2 pizzas anyway.


2. Chop about 20 pepperonis into small pieces.  I used a Tupperware food chopper.


3. Flatten each biscuit half with a rolling pin or your fingers until it is approximately 1/8" thick.

  
4. Spoon about 1 tsp pizza sauce into the middle.


5. Add a pinch of pepperoni and a pinch of each type of cheese.


6. To seal these, bring opposite corners together over the center and pinch.  Repeat for the other 2 corners.  It will look a bit like a wanton.


7. Arrange the bundles, seam-side down, in a tube pan lightly coated with cooking spray.


8. Melt the butter over medium-low heat, stir in the garlic or garlic powder/salt.  Brush on tops of bundles.  Sprinkle tops with a small amount of each type of cheese.


9. Bake in 350º oven for at least 20 minutes.  They will be a nice golden brown.  They may need a few more than 20 minutes because the parts that touch will stay a bit underdone.  I wouldn't do more than 25 minutes, though, or they might burn.


 10. Let cool in pan about 5 minutes before turning out onto a plate to serve.  Be sure to flip it over so the pretty side is up!


Individual Pizza


1. Divide each biscuit from the second can in half as if you were separating it after baking.  You will have 2 circles of biscuit dough (16 total).  Use 8 for this and 8 for the next way.


2. Roll dough out until it is an approximately 6" circle.  Transfer to a baking sheet.  Add pizza sauce leaving a 1/2" crust around the edge.


3. Top 4 with pepperonis and all with both kinds of cheese, taking care to leave a crust around the edges.


4. Brush garlic butter around edges.


5. Bake in 350º oven for 12 minutes or until crust is golden and cheese is melted.


Calzones


1. Using the remaining 8 biscuit halves, roll dough out until it is an approximately 6" circle.  

2. Spread approximately 1 tsp pizza sauce on the center of the bottom half of the circle.


3. Top with 2 overlapping pepperonis.


4. Add a pinch of each type of cheese.


5. Fold over the top half of the circle and use a fork to crimp the edges.


6. Transfer the calzone to a baking sheet and use a knife to cut 3 small slits in the top of the dough.


7. Brush on garlic butter.


8. Bake in 350º oven for 12 minutes or until crust is golden.


Heat remaining pizza sauce and garlic butter and serve as dipping sauce.